How to Safely Remove Cavity Wall Insulation
- Damian Mercer

- Mar 23
- 4 min read
Cavity wall insulation is a common method used to improve the energy efficiency of homes by filling the gap between the inner and outer walls with insulating material. However, there are situations where removing this insulation becomes necessary. Whether due to damp issues, poor installation, or the need for renovation, removing cavity wall insulation safely is crucial to avoid damage to your property and ensure your health is not compromised.
Why You Might Need to Remove Cavity Wall Insulation
There are several reasons why homeowners consider removing cavity wall insulation. One of the most common issues is dampness. If the insulation material becomes wet, it can trap moisture inside the walls, leading to mould growth and structural damage. Poor installation can also cause the insulation to settle unevenly or block ventilation, reducing its effectiveness and potentially causing further problems.
Another reason for removal is upgrading your insulation system. Older materials may not meet current standards or may have degraded over time. In some cases, homeowners may want to replace insulation with a more effective or environmentally friendly option.
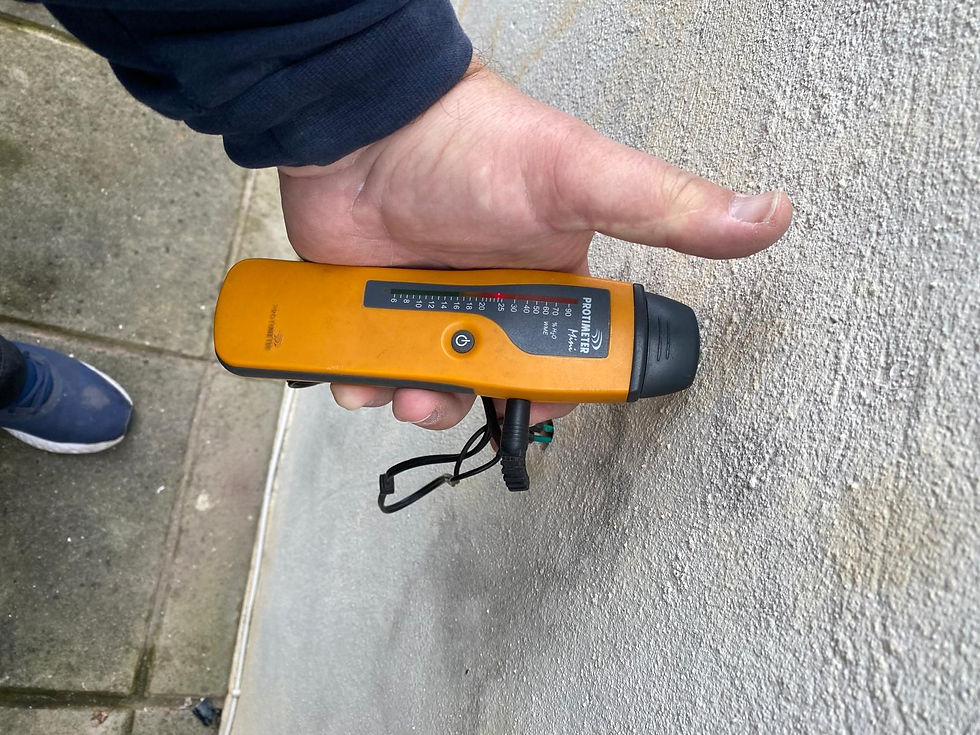
Before starting any removal work, it is important to assess the condition of your walls and insulation. Consulting a professional surveyor or insulation expert can help identify the best course of action.

How to Remove Cavity Wall Insulation Safely
Removing cavity wall insulation is a delicate process that requires careful planning and execution. Here are the key steps to ensure safety and effectiveness:
Identify the insulation type - Different materials require different removal techniques. Common types include mineral wool, polystyrene beads, and foam. Knowing the material helps determine the right tools and safety measures.
Prepare the work area - Clear the area around the walls to avoid damage to furniture and flooring. Use dust sheets and protective coverings.
Wear protective gear - Insulation materials can irritate the skin, eyes, and respiratory system. Use gloves, goggles, and a dust mask or respirator.
Access the cavity - This may involve drilling small holes in the external or internal walls to extract the insulation. Ensure you do not damage electrical wiring or plumbing.
Extract the insulation - Use a vacuum or specialized equipment to remove loose materials. For bonded insulation, careful chiselling or cutting may be necessary.
Dispose of insulation properly - Follow local regulations for waste disposal. Some materials may be recyclable, while others require special handling.
Inspect and repair walls - After removal, check for any damage or damp issues. Repair cracks, treat mould, and consider applying a damp-proof membrane if needed.
Consider replacement insulation - If you plan to re-insulate, choose a suitable material and ensure professional installation.

Is it Worth Removing Cavity Wall Insulation?
Deciding whether to remove cavity wall insulation depends on several factors. If the insulation is causing damp problems or has been poorly installed, removal can prevent further damage and improve your home's health. However, removal can be costly and disruptive, so it is important to weigh the benefits against the inconvenience.
In some cases, repairing or topping up existing insulation may be a better option. If the insulation is still effective and not causing issues, removal might not be necessary. A professional assessment can help determine the best approach.
If you are experiencing persistent damp, mould, or cold spots in your home, removing faulty insulation could significantly improve comfort and reduce energy bills in the long term.
Tips for Choosing a Professional for Cavity Wall Insulation Removal
Removing cavity wall insulation is not a DIY job for most homeowners. Hiring a qualified professional ensures the job is done safely and correctly. Here are some tips for selecting the right expert:
Check credentials - Look for certifications and memberships in relevant trade bodies.
Ask for references - Previous customer reviews and case studies can provide insight into their work quality.
Get multiple quotes - Compare prices and services to find the best value.
Confirm insurance - Ensure the contractor has public liability and professional indemnity insurance.
Discuss waste disposal - Confirm how they will handle and dispose of the removed insulation.
Request a detailed plan - A good contractor will explain the removal process, timeline, and any potential risks.
By choosing a reputable professional, you reduce the risk of damage to your property and ensure compliance with health and safety standards.
After Removal: What to Expect and Next Steps
Once the insulation has been removed, your walls may look bare and possibly show signs of previous damp or damage. It is important to allow the walls to dry out completely before proceeding with any further work.
You may need to:
Repair plaster and paint - Patch up holes and repaint walls to restore their appearance.
Improve ventilation - Ensure your home has adequate airflow to prevent future damp.
Install new insulation - Consider modern insulation options that suit your home’s needs.
Monitor for damp - Keep an eye on walls for any signs of moisture returning.
Removing cavity wall insulation can be a significant step towards improving your home’s condition and energy efficiency. With careful planning and professional help, you can ensure the process is safe and effective.
For more detailed guidance on cavity wall insulation removal, consult trusted sources or speak to a qualified expert.
Removing cavity wall insulation safely requires knowledge, preparation, and the right tools. Whether you are tackling damp issues or upgrading your insulation, following these guidelines will help protect your home and health throughout the process.
Damian Mercer is Director of Cavity Extraction Ltd, a specialist contractor focused on failed cavity wall insulation, damp, mould and related building-fabric defects. Public records show Damian as the company’s active director, while the business is publicly listed on TrustMark and presented on its own site as a specialist in cavity extraction, thermal imaging and remedial advice.
Damian also appears in industry media discussing the wider impact of failed cavity wall insulation. He writes practical guidance for homeowners, landlords and housing professionals who need clear, evidence-led advice on moisture, retrofit and property condition issues.


Comments